Tutorial Ubuntu 20.04 LTS : Cara Instalasi dan Konfigurasi NTP (Network Time Protocol) Server Menggunakan NTPd

NTP (Network Time Protocol) merupakan protocol jaringan yang digunakan untuk sinkronasi waktu baik didalam jaringan LAN (Local Area Network) maupun Internet. Umumnya port yang digunakan oleh protocol ini adalah UDP 123. Pada postingan kali ini akan membahas mengenai tutorial cara instalasi dan konfigurasi NTP Server pada Sistem Operasi Ubuntu 20.04 LTS menggunakan NTPd.
Install
Sebelum melakukan instalasi paket aplikasi terlebih dahulu lakukan update dan upgrade sistem.
Untuk melakukan instalasi paket NTP cukup ketikan perintah berikut.
Config
Secara default NTP Server memakai pool ntp default.
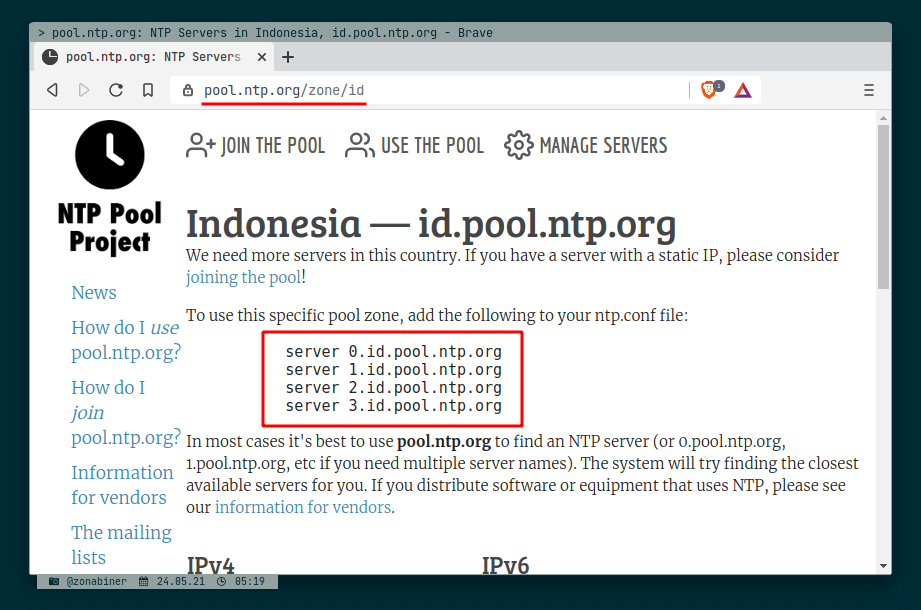
Kita akan ubah Pool Default tersebut menjadi menggunakan pool ntp khusus Wilayah Indonesia.

Kita disable pool default ubuntu dengan memberikan comment (#). Lalu kita tambahkan pool Wilayah Indonesia tersebut kedalam file /etc/ntp.conf.
# Specify one or more NTP servers.

# Use servers from the NTP Pool Project. Approved by Ubuntu Technical Board
# on 2011-02-08 (LP: #104525). See http://www.pool.ntp.org/join.html for
# more information.
#pool 0.ubuntu.pool.ntp.org iburst
#pool 1.ubuntu.pool.ntp.org iburst
#pool 2.ubuntu.pool.ntp.org iburst
#pool 3.ubuntu.pool.ntp.org iburst
server 0.id.pool.ntp.org
server 1.id.pool.ntp.org
server 2.id.pool.ntp.org
server 3.id.pool.ntp.org

# Use Ubuntu's ntp server as a fallback.
#pool ntp.ubuntu.com
Jangan lupa disekitar line berikut kita tambahkan Network mana yang boleh untuk menggunakan NTP Server yang kita buat. Sebagai contoh karena Saya menggunakan LAN (Local Area Network) 10.1.1.0/24 maka saya cukup menambahkan restrict 10.1.1.0 mask 255.255.255.0 nomodify notrap. Jika kalian mempunyai lebih dari 1 LAN Network maka tinggal kita definisikan saja network yang diinginkan dibawahnya.
# Access control configuration; see /usr/share/doc/ntp-doc/html/accopt.html for
# details.  The web page <http://support.ntp.org/bin/view/Support/AccessRestrictions>
# might also be helpful.
#
# Note that "restrict" applies to both servers and clients, so a configuration
# that might be intended to block requests from certain clients could also end
# up blocking replies from your own upstream servers.

# By default, exchange time with everybody, but don't allow configuration.
restrict -4 default kod notrap nomodify nopeer noquery limited
restrict -6 default kod notrap nomodify nopeer noquery limited

# Local users may interrogate the ntp server more closely.
restrict 127.0.0.1
restrict ::1

# Needed for adding pool entries
restrict source notrap nomodify noquery

restrict 10.1.1.0 mask 255.255.255.0 nomodify notrap
Setelah konfigurasi selesai maka terakhir jangan lupa untuk melakukan restart service NTP.
Untuk melihat status pada NTP Server bisa menggunakan command berikut.
Pengujian
Pengujian NTP Server ini kita uji dalam 2 Sistem Operasi yaitu Windows dan Linux.
Pada Sistem Operasi Windows
Untuk melakukan sinkronasi waktu melalui NTP Client dengan menggunakan NTP Server yang kita buat adalah sebagai berikut.

Pada Sistem Operasi Linux (Ubuntu Distro)
Pengujian NTP Client ini dilakukan pada sistem operasi Ubuntu. Dengan cara mengubah file /etc/systemd/timesyncd.conf pada bagian NTP= kita lakukan enable dengan mehapus tanda # dan menambahkan alamat IP NTP Server.
#  This file is part of systemd.
#
#  systemd is free software; you can redistribute it and/or modify it
#  under the terms of the GNU Lesser General Public License as published by
#  the Free Software Foundation; either version 2.1 of the License, or
#  (at your option) any later version.
#
# Entries in this file show the compile time defaults.
# You can change settings by editing this file.
# Defaults can be restored by simply deleting this file.
#
# See timesyncd.conf(5) for details.


[Time]
NTP=10.1.1.18
#FallbackNTP=ntp.ubuntu.com
#RootDistanceMaxSec=5
#PollIntervalMinSec=32
#PollIntervalMaxSec=2048
Setelah itu lakukan restart service systemd-timesyncd
Untuk melihat status NTP Client dapat dicek menggunakan perintah berikut.
Demikian tutorial mengenai cara instalasi dan konfigurasi NTP Server menggunakan NTPd pada sistem operasi Ubuntu 20.04 LTS. Happy Config!! 😉


